Solar photovoltaic system on your homestead
I'm moving Powerpoint material and several solar forum postings into this page. It's a work in progress when I need to rest my fingers from shelling corn. We've made several presentations on this topic found on the Community Outreach page. So that we can support Q&A, I've added a blog page here for discussions.
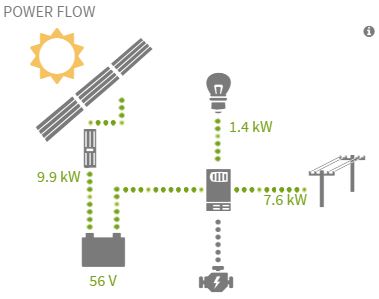
We have 14 kw of panels on a south facing roof with no shading 26 degrees of tilt. The panels are split into 4 Outback FLEXmax 80 charge controllers, into two Radian 8048A's and a battery bank. I have a Lithium Iron Phospate CALB CA100 (LFP) cells forming our battery bank ~48V with 17 cells. The Radians require a battery bank as they are grid-tie hybrid system. That is, if the grid goes down, the solar system runs normally (if there is sun). In diagram form, it looks like this:
This diagram shows the terminology of solar system hardware.

Goals of Your System
In this discussion, I'm referring to a 'homestead' not a cabin in the woods visited off and on. I am also assuming a somewhat modern lifestyle with typical energy requirements in the Great Lakes Region. If your power is crazy expensive like Hawaii, or the sun always shines like out west, your situation could be different. In the US, the average household electricity consumption is 29 kWh per day. Ok, we may not use a clothes dryer, but we enjoy hot water and using an electric stove. In the spring, we may run the incubator/heat-lamps for the chicks, start plants under extensive grow lights. In the fall, we may use the electric dehydrator and do some canning. As a result, our daily average was 42 kWh per day.
What are your goals?
Save money
- If you already have 'grid power', off-grid is not cheaper (there are some rare exceptions)
- Pay back will not be quick, could be greater than 7 years. The national trend of reducing net metering from 1 to 1 into something less favorable further draws out the pay back.
- What changes are pending with your local power company? Some are considering increasing the fee for grid-tie use of the grid as your 'battery'.
- Will you be moving? It's not so easy to remove the solar equipment and take it with you without leaving a lot of holes in your roof!
Self reliance
- Investment in hardware today pre-pays your future usage.
- Will the cost of power go up? Faster than inflation? Faster than your income? From our Michigan Public Service Commission's website, appears that power has increased an average of 3% per year for the last decade while inflation was 2%.

- Will the system you chose have reliable 'spare parts' or will you be hunting eBay for that elusive circuit board?
Whatever your motivation is, the first and most powerful thing you can do is reduce your consumption. Some power company's offer energy surveys, for free. Most power companies offer a way to download your usage data, find it, and study to answer these questions:
- Do my usage patterns indicate anything unexpected? By day? By hour?
- Does the family usage pattern indicate any area of improvements?
Watching the meter and turning off circuits can find some surprises too. That's how I found a forgotten heat tape in the crawlspace.
Use a kill-a-watt meter to measure the power consumption of individual devices. My 'new' deep freeze was way more efficient that I hope, while the very old vegetable cooler fridge (bought for our CSA) is very inefficient.
Off-grid--The traditional “cabin in the wilderness” where lifestyle is adapted to the sun. You will avoid using power in the extreme. This is not your regular 'urban' lifestyle. Your battery bank will be large enough for 2+ days of power. For the cloudy stretches and 'winter' you have and will run a generator.
Grid-tied--This is the situation for >90% of “solar” in the last 5 years. When the grid is down, solar generally stops powering your house. Some systems might provide a 'convivence' circuit that could be used for cell phone charging and such activities. You will not be 'running' your house during period of 'grid down'. When the sun is shining, you depend on "net metering" to sell power back to the grid, gaining a credit, which you spend during the night to 'buy back' power. This is the most cost-effective solution to get started in home solar. If you might add a battery later, you absolutely must make this a requirement of the system design.
Hybrid--Net metering also a method of bridging the night and weather. A battery bank is part of the system design. The size of the battery bank sets how long the system can run when the grid is down. If your battery bank is small, you may need to shed (turn off) loads to stretch out the run time.
Being in Michigan, we have both a hot summer and cold winter, ah, the best of both worlds. I'll discuss our needs and wants in order of top priority:
- Run the very large chest freezer: I wouldn't want to lose the beef & pork we've bought, nor, the chickens, turkeys and geese we've raised and processed ourselves.
- Run the well pump: This 240V pump was installed in the mid-2000's. Being in a 180 foot deep 4 inch casing well, I don't recall how far down the hole the pump hangs. As it was installed before the barn was built, it is powered from an underground conduit from the house. When we dug a trench to bring water from the well to the barn, I did lay down a cable so it could be powered from the barn. We could (and have done it) haul water by the bucket from the pond to flush the toilet. Pre-solar and pre-generator, we've experienced living for days without running potable water. It sure makes hygiene easier.
- Run the furnace: Although we have used our backup propane tanks with heater in the basement/crawlspace to recover from frozen pipes, its not my first choice. Having regular propane furnace cycle automatically is convenient. Also, we have a wood stove insert. It makes way more heat when the blower fan is turned out.

- Run the refrigerator: Lower down on the list, because these contents could go into a cooler with freezer packs. Loss of power here would just mean some deep cleaning. But, in the summer, a working fridge makes dealing with leftovers be safer.
- If we happened to have eggs in the incubator, or chicks under heat lamps, being able to power those devices. The incubator doesn't require as much energy as the heat lamps. We would have to be very careful with those, as they consume a lot of power!
- I think nearly every lightbulb on the farm has been converted to LED. They pull so little and are conveniently located. Very handy.
- Everything else electrical is a 'want', not so much to make the above 'need' list.
Design Strategy
When I was first reading about solar panels in the early 1980's in magazines such as Organic Gardening, the panels were extremely expensive and so small. At that time, solar panels were costing $35 per watt, now, they are less than 50 cents. Similar, the 'balance of system' hardware like wires, breakers, panels and inverters have also decreased in price. However, skilled labor has flipped the design strategy from maximizing the effective use of the sunlight to minimizing the number of days it takes to install the system.
Key elements that went into the design plan:
- Since we have 'grid power', do not want to adapt our lifestyle of off-grid living, and yet also want some independence, grid-tie hybrid was the first decision made. This greatly limits the type of inverter system and requires sufficient battery storage to make it work.
- This far north, solar production in the summer is over 8x the winter days. The balance between solar panel output, charge controllers and battery charging rates must be considered both in mid-summer and winter.
- A system that would run itself, not needing careful daily or weekly tending, was strongly desired.

The components in a grid-tie hybrid system consist of:
Panels: Convert the energy of the sun's light into voltage and amperage which are 'watts' (watts = volts * amps)
Charge Controllers: Take the power at the panel DC voltage and convert into the battery voltage
Battery: Stores energy
Inverter: Converts the stored energy from the DC battery into 120/240 VAC at 60 Hz.
Loads: Water pump, furnace, lights, freezer & fridge and “everything else” that need 120/240 AC
The Grid: The power company!
Generator: Not required, but can be handy. Choosing the right size is a balance of compromises discussed later.
One could power some other household equipment directly with the 48 VDC from the battery, or step it down to 12 VDC. However, in our case, distance makes the use of DC current problematic due to the distances and wire sizes needed.
Sizing the System
The very first step to setting the size is eliminating waste in your current usage.
Our Needs
Phase 0 (2011 thru 2014)
During these years, I joined several forums related to solar, energy, DIY, batteries, and homesteading. I downloaded installation and operator manuals for the variation brands of equipment, focusing on the inverter. Charge controllers seemed 'similar' enough, but the inverters, that is where the revolution in 'tiny' to 'whole house' was taking place. Some brand specialized in 'off-grid', only two at the time supported the grid-tie hybrid which I later learned was driven by the market for whole house 'backup' system for regions of the world with very unstable power grids (think Caribbean islands).
I began spreadsheet to estimate the relationship between usage, panels and energy storage. I was working on the layout of the barn we planned to build as well as studying our power usage patterns.
Phase 1 (2015 thru 2022)
In this period, as mentioned in the strategy discussion, our goal is to be able to run thru the night the well, propane furnace, refrigerator and two deep chest freezers without running the backup generator. Fortunately, they are all 'intermittent devices' that don't run all of the time. The refrigerator and chest freezers are fairly new, so, they are well insulated and efficient. A few LED lights are supported as well. In the winter, when the furnace might run, the fridge & freezers don't work as hard.
During the day, if we pay attention to the brightness of the sunlight, run an element or two on the electric stove, bake a turkey (did that one year), turn on the electric hot water around 10 am, water the garden, cautiously charge the electric car, ... all these things are possible when the sun is shining, especially May thru September when the sun in Michigan is 'useful'.
In the delicate balance of the cost of lithium batteries, in this period, I broken convention and went with an extremely small battery bank size, a mere 5 kWh. I believed that the lithium cells could absorb at such high current ratings that I could make it work. Still running fine after 7 years, I was correct.
During 2014, there were 2 adults in our household. At the 'monthly' level, we have a seasonal pattern of electricity usage shown by the data pulled from our power company (DTE).

When the data is plotted as a heat map with the rows being the week of the year and the columns being the 24 hours of a day (red being high energy usagage hours, and green being low), a pattern emerges.

We like to soak in a hot tub when the muscles are aching from hard work, or when it's cold outside. That explains the 'bright' energy consumption in the evening as our hot water is electric. When it's cold out, we like to bake and tend to cook from scratch, hence the usage in the 4 to 6 pm time frame. In the spring, our chick brooders and plant lights are pulling energy 24 hr a day. In the late summer & fall, fans, canning and food dehydrator pull power 24x7 as well
Phase 2 (upgrading for 2023)
Our 1 to 1 metering agreement with the power company is nearly complete. When it expires, the credits for selling power back to the grid will not be as useful. Also, Time of Use (TOU) billing is heading our way. Today, every kWh is worth the same $'s. When TOU come, it came become very advantageous to not buy power during the most expensive periods.
With a bigger battery, I could save and store energy from my cushy mid-day period, and consume it during the most expensive periods.
TOU required a deeper study of the energy usage by the hour.
<details about the latest power demands--EV and Miners>
Phase 3 (perhaps 2024)
The original set of solar panels are mounted on the barn roof. It's a 6 / 12 pitch, so that makes the tilt angle be 26.7 degrees. The roof faces south, so that is 180 degrees.

In reality, the roof holds 14 kW of panels, but for comparison purposes, I set the predictive website up with 1 kW. I want to compare what energy that orientation produces against several alternatives I'm pondering. These are:
- Point the panels towards the rising winter solstice sun
- Point the panels towards the setting winter solstice sun
- Point the panels toward due north (I live in the northern hemisphere)
Winter is a very dismal time for solar energy production. By aiming the panels towards the rising and setting sun on December 21st (or 22nd) we can harvest the most energy. However, for the rest of the year, this may result in too many panels attached to the charge controllers that feed the batteries. So, the breakers in the combiner box will have to be used to remove some panels to keep from over loading the electronics. In reality, a compromise might be to aim at the sending sun in mid-January, where the will 'be' 4 weeks before and after the solstice.
I use the site called PVWatts to predict the output. Beside orientation, it takes into account your location and weather. I get great correlation between my years of data against their prediction.
At first glance, most people forget that the point on the horizon of the rising and setting sun is moving every day. The tabulation of this was in almanacs and some specialized websites. I was using this one which produces this map (but I'm not finding the angle of the sun's rise & set):

Asking Google did not work, but asking ChatGPT from OpenAI was more productive.
I asked "In Ortonville Michigan, in which direction does the sun rise on December 21st?" and received:
In Ortonville, Michigan, on December 21st, the sun rises at an angle of approximately 119.5 degrees east of north. This angle is slightly south of due east. Keep in mind that these angles are approximate and can vary slightly based on the specific location within Ortonville and local topography.
So, for winter solstice the sun will rise and set at 119.5 and 240.5 degrees, respectively. While at mid-summer (June 21st), rise and set are 60.5 and 299.5 degrees. Notice these June 21st sun directions are 'north of the east-west line'. That is, during the summer, the sun actually shines on my north facing roof. How counterintuitive is that!
Someday in my spare time, I'd love to lay out stones like these ancient people did.
For this experiment, I am considering using a ballasted ground mount system, such as this one by Powerfield:

which sets the tilt angle at 25 degrees (so I also ran my due south at 25 degrees as well).
to be continued...
Predicting Performance
PVWatts is a website provided by the government to predict solar system performance using your address and a few simple inputs. It is located here.
Here is what a 10 kW system facing due south on a 6/12 pitch roof would look like:

Start with the default settings, except for 'system size' and 'tilt'. If you don't your size yet, I'd start with 10 kW and adjust later.
Hardware Selection
We've just finished the startup of our Radian based grid-tie hybrid in Southeast Michigan. After spending years reading multiple forum, we defined what we wanted the system to do, and specified Outback as the baseline. I don't find many personal discussions of grid-tie hybrid systems, I suppose those that are willing to spend what it takes, are already in a beautiful off-grid location. Anyway, I'll show a few photos and how I've setup the parameters. First, a few teasers that make it a unique install (or so we and our contractor think)
a) PV and equipment are in a barn, so the meter and new 200A feed was put into it, and our old farmhouse is now a subpanel. The entire house is fed by the system. 1930's overhead removed and everything put below ground. That does mean our house is limited to the pass through current of two Radians, but, it's enough for us.
b) Two Radians 8048A's are installed. On paper, one 8048A and one 4048A was enough 'inverter' but we would have lost some potential on those really good days. Also, didn't know if anybody actually was using those two different models together, in theory, it seemed like it should work.... In the end, decided to make them duplicates.
c) Four FLEXmax 80's fed by 14 kw of Sunpower panels (335W) which maxed out the primary south facing roof at 26.6 deg. 150V limitation of the CC drove a lot of strings for those 335W's. Contractor asked if would consider a different brand of CC get a higher voltage, but, I wanted the best possible situation for one MATE to rule them all by communication, not just observing the voltage on the bank.
d) Lithium batteries (LFP) from CALB 100 AH, 17 cells. Yes, I know, very small. Yes, I know, 17 is not the usual #. Oh yeah, and no BMS (at the moment) and bottom balanced at 2.9V, oh boy, can that be a shocking topic on many forums. More on that later.
The Power Room
We used cardboard cutouts to fine tune the arrangement.

In real life, the Outback equipment looks smaller in real life than the internet. And, the 200A DPDT bypass was huge...
As the wiring started to slow, this is what we had:

As the AHJ best summarized, a true man cave!
Label the bigger bits and pieces:

My house is 100A branch circuit out of the 200A panel. The barn will have circuits out that panel too... deep freezer, welder, outlets, woodworking equipment, etc.. It's already picked up L1/L2 outlets and a generator input to feed the Radians. Someday, that will get moved outdoors.

Fortunately, I mentioned a complete system DPDT (double pole, double throw) bypass in my project specification (bottom part of the picture above). It's a rather expensive, extremely large, and hard to find switch because it can handle 200A. We've rarely used it, when necessary, it completely by passes all of the solar inverter hardware and let's grid power flow to the panel normally supported by the inverter system.
Should something go wrong with the settings or system, this switch would let anybody 'remove the solar' and with a couple of more labelled switch changes, put everything into a limp along mode.
You might be curious about that wall everything is mounted upon. Here is the backside before the bracing was installed:

Between the studs, several dozen 'braces' were added like this:

The purpose is to stiffen and strengthen this wall.


At the time the panels were installed in 2015, since this is a barn and not an occupied house, there were no 'setback' rules. For a house, there would be a walking path along the top and sides of the panel field. This would reduce the # of panels you could fit on a roof.
Solar Panels
Ours are 42 black Sunpower 335W panels. Our metal roof is a chocolate brown. We found the all 'black' panels to be more attractive than the traditional 'solar blue'. The barn is what we see out of our kitchen window, every day.

Charge Controllers
A charge controller takes the DC power from the panels and changes the voltage to that appropriate for charging the batteries. They have a mininum and maximum working voltage so there is a matching game needed. If one panel doesn't make enough voltage, you can string them together like 2 or 3 batteries in a flashlight.
The amount of power (watts) the panel makes is set by the size (sq ft), type & quality of cells, efficiency when new, and how old they are. How much power (watts) you have 'get' depends on how strong the sun is (your location, altitude, weather, dust levels) To make it complicated, the panel voltage (VDC) on the specification sheet is affected by the air temperature.

For the amount of panel power we have on the roof, it takes 4 Outback FM80 charge controllers. Unfortunately, the 42 panels are not evenly divisible by 4.
Inverters
Inverters convert the DC voltage (from the battery bank's 48~58 VDC) into 120/240 VAC. They are not 100% efficient, so, they have cooling fans (essentially high efficiency computer fans). Their waste heat helps keep this room warm. In 7 years, of the '4 fans' within the inverters, I've had to replace one. The bearings seized. The fault messages were related to inverter overheating. I now have 1 spare 'on hand'.
Battery
Batteries are needed for two functions:
a) Store energy (kWh) for use when the sun is not shining strongly enough to produce power (kW) in balance with the house loads (kW).
b) Serve as a kind of 'buffer' or accumulator between the panels/charge controllers (which represent the production side) and the inverters (which represent the consumption side). If you have your own well, this is the analog to the pressure 'tank' that sits between your 'pump' and your 'faucet'. If you didn't have that tank (usually with an air bladder inside), the pressure switch would turn your pump on and off, until it is beaten and broken.
In this discussion, think of a 'cell' as the basic 'thing' that is combined to create a battery or battery bank. The voltage of a single cell depends on the chemistry being used (anode/cathode materials, electrolyte type, and so on). The capacity to store energy depends on the chemistry and the size.
There are a few choices for battery types. I'll briefly describe them. This is a topic that has been endless discussed on forums.
Flooded Lead Acid: Most common (and traditional) would be flooded lead acid cells. When cells are combined to create, say a 12 V battery, this is what I remember as being under the hood back in the 1970's.
Sealed AGM &Sealed Gel When cells are combined to create, say a 12 V battery, this is what I find under the car hood today.
Nickel Iron (Edison Type):
Lithium: There are many kinds of lithium batteries, all quite different in their behavior and use. One of the differences is their energy density and 'safety'. Vehicles and motorcycles want to maximum the energy stored, minimize the weight, and their duty cycle is charge them up and run until dead.... give or take. For home solar, since we aren't driving around, weight is not an issue.
<paragraphs about how I chose LFP>
<why I chose CALB>
<ordering of Phase 1>
Setting up the batteries during Phase 1

<gathering cells for Phase 2>
Setting up the expanded packs during Phase 2

Oh By the Way
In addition to adding solar, we had 2 poles from the 1930's electrification removed, put in underground service by relocating the meter panel to the edge of the road and moved the main panel from the house to the barn. I always felt those two poles were a thorn in the 'setting' of our late 1800's homestead.
For this work, the yard was ripped up to a scale never imaged...

Make lots of pictures, believe it or not, 10 years later you'll not remember exactly where what was buried.

By getting the meter out to the end of the driveway, and making the barn with the solar be the 'mains' it let the house be entirely 'backed' up by the solar system. It also put the noisy equipment (4 charge controllers and two inverters) into the barn instead of the house. While planning our project, we visited a neighbor with solar. His grid-tie system without batteries had equipment in the basement. He built a closet to contain the 'fan hum'.
Backup Power Sources
Generators
Home grid-tie hybrid inverters have a 'generator input' socket. How your inverter interacts with the generator depends on the brand, model and software settings. In some cases, the generator must be big enough to 'carry the house loads' and handle any battery charging, simultaneously. We've used our ancient 7kw gas powered Generac in this mode for years. We once finished roasting the Thanksgiving turkey with the generating feeding the system. It was a delicate balance. Some systems have a mode where the generator's power is 'combined' with the inverter pulling from the battery simultaneously. This lets a smaller generator not get bogged down. If a generator gets overloaded, the inverter will disconnect as it recognizes the input is not stable enough.
Another way to provide power is via the DC side of the circuit. Using a small generator, power a DC battery charger that is just larger than your baseline nighttime load (say, 1000 watts in our case). Like the paragraph before, the AC power is put thru the +48 VDC battery charger to flow energy into the house battery bank. When playing this angle, I run a no-name brand propane powered 1500 watt generator. It's a nice way to run thru the night or low light levels of sunrise/sunset.
In 2023, I added a better method to use the old Generac. When I connect the generator into our system, one of the behaviors of Outback's Radian is that generator must both carry the 'house load' and also 'battery charging'. There is a mode where it uses the generator and inverter in a combined mode, but to be honest, 7 kW was small enough that I was always adjusting settings early in any outage to keep the charger mode from bogging down the generator, or when we needed to run something large. Fine for me, but to complicated to create easy to use instructions should I not be home at that time!
So, the EG4 Chargeverter pulls 5 kW from the generator and outputs an adjustable 57 VDC and 100 A into the battery bank. Seems to be a great setup for this generator, it chugs along under a heavy but manageable load. Now the inverter isn't being asked to juggle so many tasks and keeps the heat, wear and tear of heavy charging out of my most expensive components. This method also remove the issue of a portable generator has the neutral and ground bonded, which is conflict of what the house system would want to see when connected via the 240 V inverter generator input.
Pulling Power from our EV
Our 2017 Chevy Bolt EV has a 64 kWh battery. Maybe in the future, we'll be able to buy a charger box that can easily give access to the energy stored within it' high voltage battery, but for now, it can be done the 'hard way'.
The car will charge its 12 VDC battery by its onboard high to low voltage system. I believe this can handle moving 1400 watts. If you try to pull too many watts, the voltage of the 12 V battery will drop. Eventually, the car's computer would shut down... bad.
The car has a timer limit for this conversion. Think of it like the ACC having a timer so you don't run the battery down listening to the radio in the 70's. There is a workaround. With the car parked on a flat surface, ideally with wheels' chocked, put the car into neutral and exit the 'passenger side door'. This tricks the computer into thinking you are still sitting the driver's seat, so, it keeps the high to low voltage converting running.
Use an inverter that runs from the 12 VDC battery under the hood. If small enough, the cigarette lighter socket is an option, I didn't want to risk blowing the fuse so I clamp directly onto the 12 VDC battery terminals. Use this 110 VAC inverter output to run a battery charger.
My 48 VDC battery charger uses 110 VAC. Now, you have a way to flow EV high voltage battery energy, into the 12VDC battery, into the inverter, into the battery charger, into the house battery bank. This is horribly 'not efficient', however, through the night, the 'house loads' are around 1000 watts to power the solar system hardware, fridge, freezers, well, furnace and LED lights (but not electric hot water heater, electric stove, things with electric heating elements like toasters and heaters).
Tools of the Trade
Voltmeter that can measure at the 0.001 Volt level which is more important if your batteries are lithium cell based. I use a Fluke 117 Digital Multimeter.

Internal battery resistance gauge: Yaorea YR 1035 is battery powered gauge to measure battery internal resistance with a 4-wire method to measure the internal resistance of the battery cell using 1 kHz AC signal. You only need this device if you are inspecting and sorting cells. I did find a couple of cells that were "not like the others" in my flock. I set those aside.

FLIR thermal camera... ok, this is on my wish list. I have seen some Youtube videos where 'thermal imaging' was able to find a bad cell, before disaster struck.
Torque Wrench--Battery terminals have torque requirements
Appropriate Wrenches--This is not the place to use adjustable wrenches, don't risk damaging the bolt's head.
Wrap all your wrenches in electrical tape to reduce the risk of accidental shorts.
I once leaned sweaty bare arms across the top of the battery bank. Much like touching an electric fence as a child, you only do that once. Wear long leaves and they do make electrically non-conductive glooves as well.